Cinnamon Applesauce ornaments
January 3, 2011
Recently my granddaughter Elise was looking for a ‘Christmas Store’ project for her class room; each student makes things to sell (items must be hand made), then the classroom is set up like a store, and the public is invited to come shop one day. The class then takes a field trip to a local grocery store and uses all the money earned to purchase food for the local food shelf. Warms your heart doesn’t it?
Shortly after Elise asked me if I had any ideas for her project, I came upon this recipe and remembered making these about 20 years ago with her mother and sisters. I thought about all the fun scrap booking embellishments that could be used to decorate the ornaments (not available 20 years ago); the possibilities, options, and fun were endless! Elise approved the idea and we were in business!
Cinnamon Applesauce Ornament Recipe
1 cup cinnamon
1 T. ground cloves
1 T. nutmeg
¾ cup applesauce
2 T. Tacky craft glue
Combine cinnamon, cloves, and nutmeg; mix in applesauce and glue. Knead well; dough should be smooth and stick together – if too crumbly add more applesauce, if too sticky add more cinnamon. Roll dough on tin foil to 1/4 inch thickness; cut with cookie cutters. Use a straw or toothpick to make a hole for hanging. Let air dry for 4 to 5 days or more, turning twice daily. Makes about 2-3 dozen, depending on size of cookie cutters. Decorate! (Ornaments shrink somewhat as they dry.)
Whole grains cooking class – January
December 6, 2010
All my life I have loved cooking and baking; what I don’t like are flops or blah recipes. I realized long ago that premium ingredients gave me better results, and that using whole grains gave me healthier results. In January I will be offering a whole grains, REAL-FOOD approach to a healthier diet, sharing some delicious and easy recipes and methods for healthier cooking and baking.
The class will be held at Little Red Hen in Dassel, Minnesota, and class participants are welcome to browse the shop for after-Christmas deals.
Class info:
Really Good Real Food
Scrumptious, easy-peasy recipes that will introduce more healthy whole grains, nuts, and seeds into your diet. Cheryl will demonstrate some delicious recipes while explaining the health benefits of using wholesome and premium ingredients. From what you learn here, you will be able to go home and modify any of your own favorite recipes into a healthier version. Ever wonder what the difference is between pure cane sugar, raw cane sugar, and beet sugar? Or canola oil, olive oil, or coconut oil? Come and find out.
Come prepared for a delicious sampling of:
Almond Fruited Chicken Salad made with whole grain pasta
Fresh whole grain Quick Mix Bread Sticks
Fruit Smoothies
Hearty Oats & Honey Granola
Bogus Mrs. Fields Chocolate Chip cookies
Each participant will receive recipes, helpful handouts, and granola to take home.
January 10th, Monday 6:30 – 8:30 p.m. Cost – $16.00
Register for this class at Little Red Hen during the December sale (December 9 – 11), or call Cheryl Niemela at 320-286-5384.
Email me with questions – amazingvase@hotmail.com
Gun rack finds a new life as a chalk board
December 3, 2009
I didn’t need a red gun rack any more than I needed a hole in the head, but when I spied it at a thrift sale, I purchased it with the intent to give it a new purpose in life. My husband cut a board for me on which I sprayed a few coats of chalkboard paint, then he screwed the board to the back of the gun rack – and PRESTO! I now have a message center and an apron/hat/bag/you.name.it holder.
What have you turned into a chalkboard?
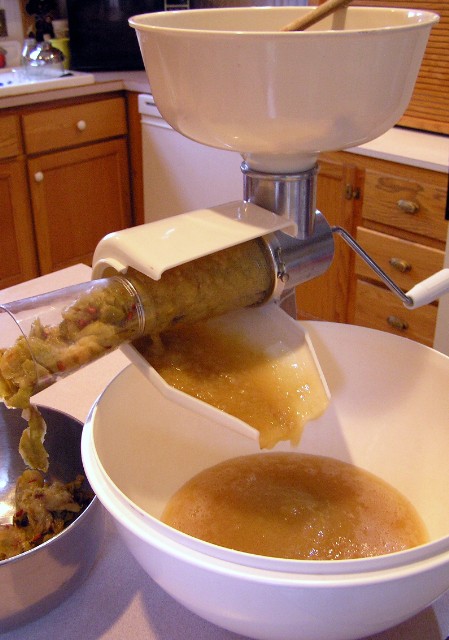
Applesauce technology
October 15, 2009

Why did I not hear about this invention 20 years ago? Apparently this type of food mill has been around for some time, and I’m glad I finally found out about the handy, dandy applesauce maker that has taken the chore out of making applesauce. Not even close to work.
This easy: wash apples, cut in half, cook until soft, put in hopper and turn handle. No peeling, no coring, no removing seeds or stems. The applesauce comes out one side, and the peels, stems, and seeds come out the end.
We purchased this food mill from Lehman’s on the internet, but I’ve seen other brands out there that appear to do the same thing. I really like the suction base that allows you to attach it on any solid surface. The only downfall I can think of, is that it doesn’t wash itself. Good thing I have teenage girls that love to wash dishes!
Freezer sweet corn recipe
August 26, 2009

Freezer sweet corn recipe
13 cups raw corn cut off the cobs
1 cup half & half
1 cup butter (not margarine)
Melt butter in cake or roaster pan. Add corn, then pour on top the half & half. Bake at 275 degrees for two hours. Cool, then bag in freezer bags and freeze.
Very delicious!
Homemade Christmas gifts bring extra joy
December 26, 2008

Every year our children draw names amongst themselves for gift giving. This year they added a twist for giving gifts; the gift had to be either hand-made by the giver, from a thrift store, or a service offered by the giver. The reason they decided to do this, of course, is the state of the economy and their pocketbooks. It has been so fun to watch them coming up with ideas for each other; I believe they were more excited and put much more thought into these gifts than the usual store bought gifts.
They came up with some really neat ideas; Scott made Julie some picture frames with wood taken from the old hayloft floor of the barn, Jenny made Shari soy candles, and Shari came up with an incredibly fun idea for Megan. Shari purchased a Guess Who game from a thrift store, and made it into a personalized ‘Megan’s Guess Who?’ game. She replaced each picture that came with the game with a picture of a friend or family member of Megan’s. Megan was thrilled with her very own version of Guess Who?, and all the kids have had fun playing with it! The kids took a vote after gift opening, and everyone agreed that the new rules for gift giving will apply from now on; they all enjoyed giving gifts from the heart!
Anyone could make their own personalized Guess Who? game using their own pictures; and by getting the game from a garage sale or thrift shop it will cost just pennies!
Make your own soy candles
November 29, 2008

This year a lot of the gifts we give will be hand made, and my hand made gifts will be candles.
I have been learning to make soy candles, and I am surprised at how easy it is with the improved waxes available. I purchased Ecosoya CB Advanced Soy Wax from Wholesale Supplies Plus, one of my favorite suppliers, and would recommend it to anyone wanting to try to make their own soy candles. I chose soy wax because soy candles burn cleaner and longer than paraffin candles, making them a ‘greener’ choice for the home and the environment.
WSP’s sister website, Fragrance and Flavors, offers a huge selection of quality fragrance, flavor, and essential oils for candle making. Their shipping special is a flat $2.95 on all orders over $50.00, which really helps to keep the cost of the fragrances reasonable. Some of my favorites that I have tried and would highly recommend are: Pumpkin Crunch, Vanilla Bean Noel, Apple Caramel Crunch, French Vanilla Pear, Spiced Cranberry, Gingerbread, Cinnamon Cider, and Cherry Almond. Both the hot and cold throw scent have been fantastic!
I have been using jelly and mason jars for containers, and doing some fun decorating with the lids to spice them up. For the zinc lids, I cut out a circle of scrapbook paper that matches the candle for the center of the lid. For the ring and lid sets I spray paint the rings with Antique Brass Metallic Rust-oleum spray paint, then cover the lid with scrapbook paper. I figure that I can make soy candles for about half the price as buying them, but that isn’t counting for my time to make them. But it’s also not counting the fun to make them, either, or the pleasure of ‘Pumpkin Crunch’ filling my home!
Some resources I used to get started are these: Using Ecosoya Wax, and securing wicks in the container.
Please share with me if you have a favorite candle scent, or a creative idea for decorating mason jars!

Homemade Granola Recipe
November 17, 2008

4 cups regular oatmeal (not quick oats)
1 cup rolled wheat (or substitute oatmeal)
1 cup instant dry milk
1 cup coconut flakes
1 cup peanuts
1 cup sunflower seeds
1 cup wheat germ
½ cup oil
½ cup applesauce
1 cup honey
¼ cup brown sugar
1 Tablespoon vanilla
2 cups raisins, craisins, or dried blueberries
1 cup sweetened carob chips (optional)
Mix first seven dry ingredients in large roasting pan. In a saucepan mix oil, applesauce, honey, brown sugar, applesauce, and vanilla; heat until mixture is warmed and runny, then pour over first mixture in roasting pan, and stir until well mixed. Bake at 250 degrees for 45 – 60 minutes (or more), until desired brownness, stirring every 15 minutes. (45 minutes will be light brown and softer, 60 minutes will be brown and crispier.) Let cool, stirring every 10 minutes three times. When completely cool add dried fruit and/or carob chips.
Use with milk for a cereal, or use as a topping on yogurt or ice cream.
Homemade Pizza Sauce Recipe
November 3, 2008
This is the tastiest homemade pizza sauce recipe that I have been able to find.

2 cups tomato juice or sauce
1 – 6 oz can tomato paste
5 Tablespoons grated parmesan or romano cheese
3 or 4 cloves of garlic, crushed
2 Tablespoons olive oil
1 Tablespoon oregano leaves
1 ½ teaspoon sugar
1 teaspoon salt
¾ teaspoon black pepper
¾ teaspoon marjoram
¼ teaspoon chili powder
Mix all together. Make 3 cups.


